
Switching to a green web host is one of the quickest ways to cut your website’s carbon footprint and boost performance. The right host can deliver faster load times, stronger uptime, and lower emissions – all without affecting visitors.
Table of Contents
Why going green matters for your site and brand
A hosting provider powered by renewables reduces your site’s environmental impact and strengthens your brand story. Many customers actively choose businesses that act on sustainability. By moving to a verified green host, you’re signalling that performance and responsibility can work together, a win for both visitors and the planet.
Understanding the risk of downtime and how to avoid it
Downtime during migration is usually caused by poor DNS planning, missing files, or delayed propagation. Even brief outages can result in lost sales or reduced trust.
Avoid this by setting up a staging site on your new host and testing thoroughly, taking a complete backup (files, database, and email) stored in two safe locations, lowering your DNS Time to Live (TTL) 24–48 hours before the move, pre‑provisioning SSL certificates and fixing any mixed‑content issues, and scheduling migration during low‑traffic hours.
Choosing a verified green hosting provider
The right hosting provider should combine proven sustainability credentials with strong technical performance. Start with a shortlist that meets environmental standards, then assess their speed, reliability, and service quality.
How to check a host’s sustainability claims
Confirm the host is listed in the Green Web Foundation directory and provides clear evidence of renewable energy use, power usage effectiveness (PUE), and carbon offset policies. Avoid vague claims without proof. For related myths about performance trade-offs, see our green hosting myths debunked guide.
Comparing performance, price, and support for your needs
A sustainable host should also meet your site’s performance and budget requirements. Test candidate providers with GTmetrix, EcoPing, or WebPageTest for load times and reliability. Check for uptime guarantees and responsive, knowledgeable support. Match their plans to your needs, storage, bandwidth, SSL, and whether free managed migration is offered.
Preparing your site for a smooth migration
Thorough preparation ensures your move to a new host is quick, safe, and invisible to visitors. The aim is to have a fully tested, ready‑to‑go copy of your site that can go live the moment DNS is switched.
Backups, updates, and staging environments explained simply
Begin with a full backup of your website, including files, database, and email accounts. Store at least one copy locally and another in secure cloud storage. Update WordPress core, plugins, and themes to their latest stable versions to prevent compatibility issues. If available, use a staging environment to clone and test your site before migrating.
Lowering DNS TTL for a fast, low‑risk cutover
Lower your DNS TTL to 300–600 seconds at least 24–48 hours before migration. This shortens propagation time, so visitors are routed to the new host quickly. After confirming the site works perfectly on the new server, restore your original TTL to optimise DNS lookups.
Migration checklist – zero downtime
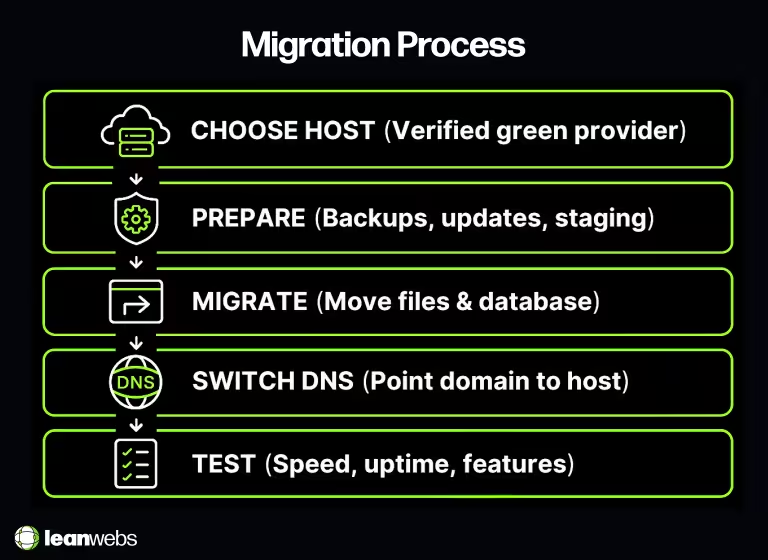
- Choose a verified green host that meets performance, budget, and sustainability needs.
- Set up a staging site on the new host for testing.
- Back up all site files, databases, and email accounts to multiple locations.
- Update WordPress, plugins, and themes to the latest stable versions.
- Lower DNS TTL to 300–600 seconds at least 24–48 hours before migration.
- Pre-provision SSL certificates on the new host and resolve any mixed-content issues.
- Migrate the site using a plugin, managed service, or manual transfer (files + database).
- Recreate email accounts and update MX, SPF, and DKIM records if needed.
- Test the staging site for functionality, speed, and compatibility.
- Switch DNS (nameservers or A/AAAA records) to point to the new host.
- Clear caches (local, browser, CDN) and verify from multiple networks.
- Restore DNS TTL to its original value after propagation.
- Monitor uptime and performance for at least two weeks post-migration.
Moving your site to the new host step by step
Migrating your site can be done manually, via plugins, or with the help of a managed migration service. The best method depends on your comfort with technical tasks and the size of your site.
Using migration plugins vs managed migration services
Plugins like Duplicator and All‑in‑One WP Migration allow you to export your site’s files and database for import into the new host. These are straightforward for most WordPress sites, but require attention to detail. Managed migration services, often free with premium hosting plans, transfer your site for you, ideal if you want to minimise risk and save time.
Copying files, databases, and email safely
If migrating manually, connect to your old host via SFTP to download all files, and export your database via phpMyAdmin. Upload files to the new server, import the database, and update wp‑config.php with the new credentials.
For email, recreate accounts on the new host and update MX, SPF, and DKIM records before switching DNS. Test all accounts to ensure no mail is lost during the move.
Switching DNS without losing visitors
The final step in your migration is pointing your domain to the new host. How you do this – updating nameservers or changing A/AAAA records – will affect how other services like email are handled.
When and how to update nameservers or A/AAAA records
Updating nameservers moves all DNS management to your new host, which can be quicker but requires setting up all records there. Editing only A/AAAA records changes the web hosting location while keeping email and other DNS records intact at your current provider. Choose the method that minimises disruption to your setup.
Restoring TTL after propagation is complete
Once DNS changes have propagated and the site is fully functional on the new host, restore your original TTL value. This optimises DNS resolution speed for visitors while keeping your domain settings stable. Double‑check that SSL certificates, email, and CDN integrations are working as expected before considering the migration complete.
Testing and monitoring after the move
After migration, confirm that your site is performing well and delivering the environmental benefits you aimed for. Early testing helps catch issues before they affect users.
Running performance and uptime checks
Use tools like GTmetrix, Pingdom, or WebPageTest to verify load times and Core Web Vitals on the new host. Set up an uptime monitor to alert you if the site goes offline. Test critical functions, logins, forms, checkout, on both desktop and mobile.
Measuring your new host’s carbon impact
Run your site through the Website Carbon Calculator or EcoPing to measure grams of CO₂ per page view. Compare results with your pre‑migration baseline to see the improvement. Keep tracking these metrics regularly to maintain both speed and sustainability gains.
Quick wins to boost speed and cut carbon further
Once your site is live and stable, take advantage of your new host’s capabilities to maximise performance and sustainability. These quick changes can deliver immediate results without major development work.
Enabling HTTP/3, caching, and CDN settings
Check your hosting control panel for HTTP/3 support and turn it on to speed up connections. Enable full‑page caching to reduce server load, and configure a CDN to serve content from locations closer to your visitors. This not only improves speed but also reduces energy use per request.
Removing leftover bloat for a leaner site
Audit your site for unused plugins, themes, and media files. Remove anything unnecessary to reduce page weight and improve load times. Convert large images to WebP format, and minify CSS and JavaScript.
Outdated Site? Let's Rebuild It Right
We design and develop fast, sustainable websites with purpose built in. No bloat. No shortcuts. Clean, future-friendly builds made to last.
Wrapping up your green hosting migration
Migrating to a verified sustainable host is more than a technical upgrade – it’s a long‑term investment in speed, reliability, and environmental responsibility.
Following the steps in this guide will help you avoid downtime, maintain a seamless user experience, and measure your success both in performance and reduced carbon emissions.
Continue to monitor your site’s uptime, speed, and measure carbon impact regularly. Apply quick‑win optimisations when needed, and review your hosting provider annually to ensure they maintain their sustainability commitments. A smooth migration is just the first step toward running a faster, greener, smarter website.
For a deeper understanding of eco-friendly hosting principles, read What Makes Web Hosting Green and if you’re weighing the return on investment, explore our Is Green Hosting Worth It guide.